Thursday, March 13, 2014

Learning Underscore.js - Collections

In part one we looked at a few of the useful array methods that Underscore provides for us. In this part of the tutorial we’re going to take a look at some of the syntactic sugar that Underscore gives us to work with array-like collection. An array-like collection is something similar to array in that it is a collection of things as opposed to a single value, but they lack some of the things that arrays possess, such as a length property.
We’ll be using the following JavaScript collections in the examples shown in this tutorial:
var myCollection = {
one: ["one", "two", "three", "four", "five"],
two: [1, 2, 3, 4, 5]
};
var myCollection2 = [
{ name: "Dan", age: 33 },
{ name: "Fred", age: 44 }
];

each()

The each() method is used to iterate over an array-like collection. It accepts a minimum of two arguments where the first argument is the collection to iterate over and the second is an iterator function which is invoked for each item in the collection. To use this method with our first test collection, we could do this:
_.each(myCollection, function(item) {
alert(item.length);
});
The arguments passed to the iterator function will vary depending on the type of object it is iterating; if it is a standard array the function will be passed the current item, the array index the item is at, and the source array. If it is an object, such as in this example, the arguments are the value of the current item, the key (or property name), and the source object.
The each() method may also accept a third argument which is the context in which the iterator function should run. This can be incredibly useful when using each() inside a callback function, as typically the value of the this object is lost inside these functions, which can be corrected by passing in the object to use as the context for this.

size()

We used the length property as the value of our alert in the previous example, which worked because the value we were checking was a proper array. I mentioned above that one of the differences between arrays and array-like collection is that the latter do not have length properties. That can be annoying can’t it? The size() method overcomes this minor irritation for us and tells us the number of items in the collection:
_.size(myCollection);
With our test object, this will result in a value of 2, which can be useful when we need to know how many items we’re dealing with, but don’t necessarily know if we’ll be working with an array or an object.

pluck()

pluck() is a super-useful method used to extract a matching property from a series of collections. This can be incredibly useful when working with something like a collection in Backbone. To ‘pluck’ each value of name from our test array, we could use this:
_.pluck(myCollection2, "name")
In this case out test collection is an array where each item in the array is an object containing two properties. The method returns an array containing the values extracted from the source collection.

filter()

The filter() method is used to filter values out of a collection that do not pass a conditional. Similar to the each() method, it accepts a collection and an iterator function (and optionally a context), and returns an array containing only those items that pass the test. To filter all items out of our second test collection whose name properties do not contain the letter a for example, we would use the method like this:
_.filter(myCollection2, function (item) {
return item.name.indexOf("a") !== -1;
});
The call back function we provide should encapsulate the logic required to test each item and should return either true or false. Items for which false are returned are not include in the array that is returned.
This method also has a polar opposite, the reject() method, which returns an array containing only those items that that fail the test.

shuffle()

Need to take a sorted collection of items and shuffle them randomly in a non-biased way? If so, the shuffle() method will be your friend. Let’s say we want to shuffle the array stored in the key one in our test object; we could simply do this:
_.shuffle(myCollection.one)
The algorithm used to shuffle the collection is based on a tried and tested method of randomly sorting a collection so you can be sure that the array that is returned will be as random as if we had drawn scraps of paper from a hat.

sortBy()

The sortBy() method allows us to perform a sort on a collection based upon specific criteria. For example, to sort the objects within our third example collection based on the name property of each object we could use the following code:
_.sortBy(myCollection3, function (item) {
return item.name;
});
The arguments used with this function have the same signature as those used with some of the other methods we’ve looked at today and consist of the collection as the first argument, an iterator function as the second and optionally, a context as the third. The iteration function simple returns the value in the collection that we want to sort by. The sort is always done in ascending order.
We can also use this method with integers, for example:
_.sortBy(myCollection3, function (item) {
return item.age;
});
In this case, the objects are sorted based on the age property instead, which will result in an array where the first item is the youngest and the last the oldest.
Source: http://www.developerdrive.com/2012/05/an-introduction-to-underscore-js-%E2%80%93-part-2-array-like-collections/

Learning Underscore.js - Arrays


Underscore.js is a tiny JavaScript utility library that makes working with some of the common data structures used in JavaScript much easier. Minified and GZipped it weighs in at less than 4Kb and where possible it delegates functionality to native browser implementations for performance. It has no other dependencies and so adds very little overhead to your total script assets. It can be used on the client or server with equal ease.
Using Underscore is extremely easy; it isn’t tightly bound to the DOM, doesn’t make any assumptions about other libraries or frameworks that may be in use and doesn’t require any setup or configuration; you simply include the library file in your page and you can start calling its methods.
We’ll be using the following JavaScript arrays in the examples shown in this tutorial:

var myArray = ["one", "two", "three", "four", "five"];
var myArray2 = [1, 2, 3, 4, 5];
var myArray3 = [1, 5, 2, 2, 8, 5, 3, 8, 9, 0];

Working with arrays

Arrays are very common data structures in JavaScript, heavily used by many popular JavaScript libraries, for example, whenever jQuery returns an element (or elements) from the DOM, it returns it (or them) in an array. You may be using arrays and not even know it! In case anyone doesn’t know, an array is simply a collection of native values (strings, integers, objects, etc) where each value has a numerical index associated with it. Let’s look at some of the useful array methods provided by Underscore:

indexOf()

JavaScript has long had the indexOf() method for finding a character or sequence of characters within a string of text. The latest version of JavaScript (or ECMA Script upon which each browser’s implementation of JavaScript is based) includes an indexOf() method that works in a similar way but with arrays. It returns either the index of the first matching item in the array or -1 if a matching item is not found.
But guess what, only the very latest version of Internet Explorer supports this incredibly useful array method, so if older versions of IE must be supported, we need some other way of adding support. Enter the ring Underscore, which allows us to make use of it on older browsers.
To use this method to find the index of the string three in our test array, we could use the following code:

_.indexOf(myArray, "three")
All Underscore methods are attached the _ object, much in the same way that jQuery methods are attached to the $ object. To use indexOf() we supply the array to search as the first argument and the term we are searching for as the second. There is also a third argument which takes a Boolean indicating whether the array is already sorted, which runs a much faster search algorithm. Underscore also ships with a lastIndexOf() method which finds the last occurrence of something within an array. Pretty useful.

union()

Another useful method, this time with no native JavaScript counterpart to leverage, is the union() method. This method takes any number of arrays and returns a single array containing any items that appear in one or more of the original arrays. To see the union of two of our example arrays, we could use the following code:

_.union(myArray2, myArray3)
The returned array will contain the items in the order in which the source arrays are passed in.

uniq()

Another exceptionally useful method, similar in some respects to the union() method is uniq(). This method accepts a single array as an argument and returns an array containing only the unique items from the source array. To filter out the duplicates in our third example array, we could pass it to uniq() like this:

_.uniq(myArray3)
Just like the indexOf() method that we saw a moment ago, this method can accept a Boolean as the second argument which specifies whether the source array has already been sorted. If it has a much faster algorithm is used to weed out the duplicates.
This method uses the strict equality test (===) in its comparator function to determine whether two items are identical or not. In some situations, this may be more strict than we require, for example this !== This. To help alleviate issues such as this, we can pass a transformation function to this method as the third argument. If we were trying to make the method case-insensitive, we could use this:

_.uniq(myArray3, false, function(item) {
return item.toLowerCase();
});
The transformation function receives the ‘current’ item each time it is invoked (it will be invoked for each item in the source array) and should return the transformed item. In this case, we just convert the item to lowercase before returning it. No more casing issues.

zip()

The zip() method takes any number of input arrays and returns a number of arrays where the same items from the same indices or the source arrays have been merged. It sounds tricky in words, but when you see what happens you’ll understand immediately. To zip up the first and second of our test arrays for example, we would use the method in this way:

_.zip(myArray, myArray2)
When you see the output of this expression, you’ll see that the first array returned contains the items “one” and 1, the second array contains the items “two” and 2, etc.
In this example, both source arrays contain the same number of items, so the output is pleasingly neat. We can also pass arrays with differing numbers of items and the method will still work, but some of the arrays returned will have undefined values at some of the indices.

range()

The range() method is interesting because although it is used with arrays, it doesn’t accept any arrays as arguments. Instead it accepts integers, and uses them to return an array containing a sequence of numbers.
It can accept several arguments; the first argument, which is optional and defaults to 0, is the starting number. The second argument is the number to stop at, and the third argument is the step value. Again, this may be a tricky method to get your head around theoretically, but in this case, examples speak louder than words, so let’s take a look at a couple of variations.
If a single argument is provided, it is assumed to be the number to stop at and 0 is used as the starting number. 1 is used as the step:

_.range(3)
The output of this would be an array containing the values 0, 1 and 2 (remember, array indices are zero-based). If two arguments are provided they are assumed to be the starting and stopping number. 1 is used as the step:

_.range(0,3)
This would give the same result as the first example. To use a step value other than 1 we muist provide all three arguments:

_.range(0,30,10)
This now gives the result 0,10,20. We can provide a lower ending number than the starting number if we wish; in this case, the step value provided should be negative:

_.range(30, 0,-10)
In this case, the output is now 30,20,10. Although possibly not used as often as other method we have looked at, range() is nevertheless a useful method when a list of numbers between a particular range is needed.

Source: http://www.developerdrive.com/2012/04/an-introduction-to-underscore-js-%E2%80%93-part-1-arrays/

Saturday, March 1, 2014

Debug your ASP.NET Application while Hosted on IIS

Overview

Generally we debug our ASP.NET web application from Visual Studio. Visual Studio has its own ASP.NET engine, which is capable enough to run and debug your web sites inside Visual Studio. However, if your site is hosted on IIS and you want to debug that site directly, how would you debug it? When we host sites on IIS, the Worker Process (w3wp.exe) is used to run the web application. We need to attach to this particular process from Visual Studio to debug the web application. This article describes the overall idea of debugging an application using this method. It also describes the Worker Process, Application Pool and selecting a particular process if there are multiple Worker Processes running on IIS, using iisapp.vbs. I hope you will enjoy this article and provide your valuable suggestions and feedback.

ASP.NET Debugging vs. IIS Debugging

Visual Studio has its own integrated debugging engine, which debugs our code when we run the application in Visual Studio. If we are developing a site and need to debug the code, we just set breakpoints and do the debugging (Note: In this article I do not describe how to set the debug mode).
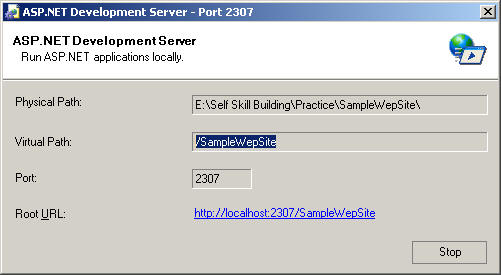
When we run the application, execution breaks when certain a breakpoint is reached. It is very simple, because when an ASP.NET application is running in Visual Studio, it is under the control of the ASP.NET Engine which is integrated with Visual Studio. If you want to check which process is running for debugging, run the web application from Visual Studio: you will get a popup notification as shown below.

Fig. 1: Taskbar popup when debugging is started from Visual Studio
This indicates a process is starting to run the ASP.NET application. Double-click on the icon and a popup window will appear to show the details.

Fig. 2: Development Server process details
Behind the running process is WebDev.WebServer.exe. When We press F5 to run the application, this process starts to execute the it. If you want run the application from command prompt, you have to perform the following steps.

Steps to run a web application from the command prompt:

  1. Open The Visual Studio command prompt
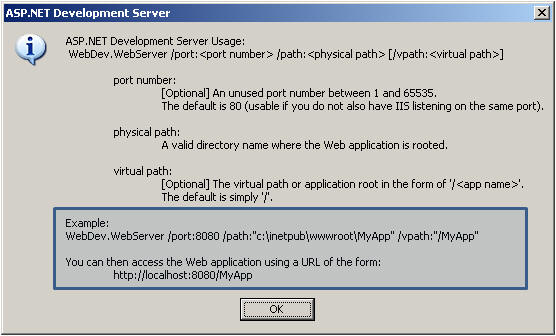
  2. Run WebDev.WebServer
The following screen will come up. Check the Example section there.

Fig. 3: WebDev.WebServer usage notification
Now back to IIS debugging. IIS comes into the picture when we deploy or host the site. After deploying the site on IIS, if we want to debug the site there, we can't do it directly as in Visual Studio. IIS has its own Worker Process which takes care of all execution and maintenance of deployed web applications. I will describe the details of the Worker Process in a later section. So, if we have running process in IIS and we need to debug the application, first of all we have to attach to the correct process from Visual Studio. Before describing that, let's just have a look at the Worker Process and Application Pool.

What is the Worker Process?

The Worker Process (w3wp.exe) runs ASP.NET applications within IIS. All ASP.NET functionality runs under the scope of the Worker Process. When a request comes to the server from a client, the Worker Process is responsible for generating the request and response. Its also maintains the InProc session data. If we recycle the Worker Process, we will lose its state. For more information, read this article: A Low-Level Look at the ASP.NET Architecture

Application Pool

This is one of the most important things that you should create for your own application in a production environment. Application Pools are used to separate sets of IIS Worker Processes that share the same configuration. Application Pools enable us to isolate our web application for better security, reliability, and availability. The Worker Process serves as the process boundary that separates each Application Pool, so that when one Worker Process or application has an issue or recycles, other applications or Worker Processes are not affected.

Fig. 4: Relationship between Application Pool and worker process in IIS

Default Application Pool

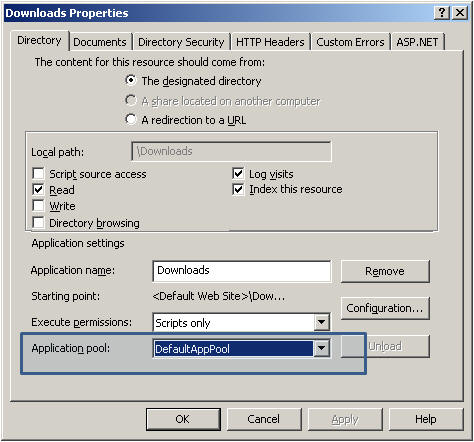
The name of the default application of IIS 6.0 is DefaultAppPool. After hosting the site on IIS, if we check the properties of the virtual directory, we can to view that information as follows.
  1. Start Menu → Run command → inetmgr
  2. Expand DefaultWebSites or Other Web Sites, where you have created the virtual directory
  3. Right Click on the virtual directory
  4. Click on Properties
The following virtual directory properties screen will come up, showing the Application Pool name which is assigned to the selected site.

Fig. 5: Virtual directory properties showing Application Pool name
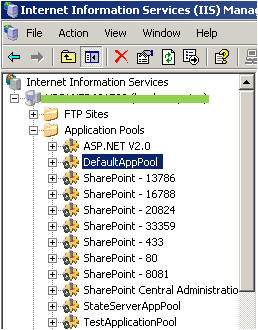
If you want to check the list of all Application Pools in IIS, you have to expand the Application Pool node on IIS Server.

Fig. 6: List of Application Pools
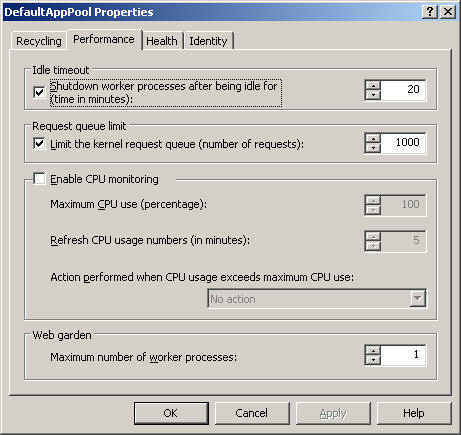
Now, each and every Application Pool should have the minimum of one Worker Process which takes care of the operation of the site which is associated with the Application Pool. Right-click on the Application Pool → go to the Performance tab, check near the bottom of the tab, there is a web garden section, and by default, the number of Worker Processes is 1. An Application Pool containing more than one Worker Process called a Web Garden.

Fig. 7: Application Pool properties showing Web garden

Creating and Assigning an Application Pool

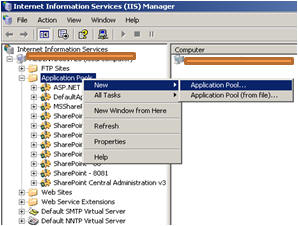
  • Open the IIS Console, right-click on the Application Pools folder, select New
    Fig. 8-1
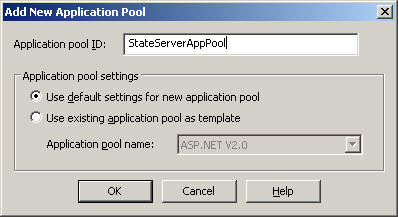
  • Give the Application Pool ID and click OK.
    Fig. 8-2
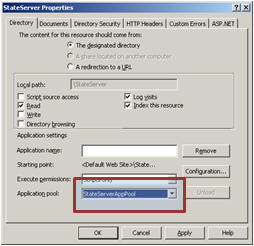
  • Now, right-click on the virtual directory and assign the newly created Application Pool to that virtual directory.
    Fig. 8-3
Now, this web site will run independently, within StateServerAppPool, so any problem related to other applications will not affect this application. This is the main advantage of creating a separate Application Pool.

How to start?

What I have said up to now give you a good idea of Worker Processes and Application Pools. You should have a clear understanding on these before going on to the next part. Now I will show you how to debug a site which is hosted on an IIS Server.
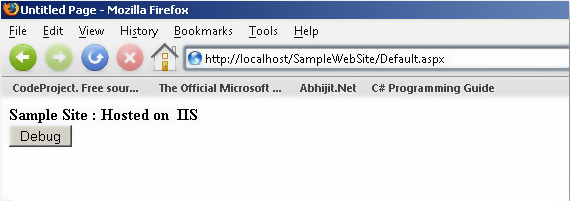
For the demonstration, I have created a web site called SampleWebSite and hosted it on to my local IIS. Below is default page output.

Fig. 9: Sample web site

Which process to attach to?

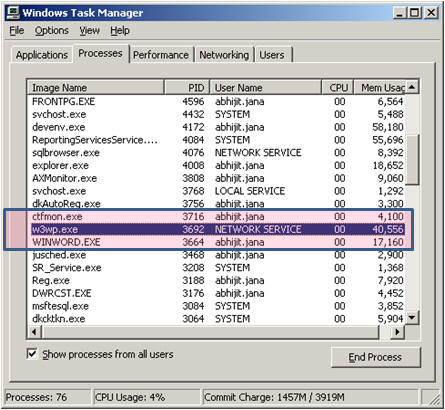
Now, as I have already explained, the process name is w3wp.exe, so we can check it from our Task Manager whether or not the Worker Process is running.

Fig. 10: Task Manager showing the running IIS process
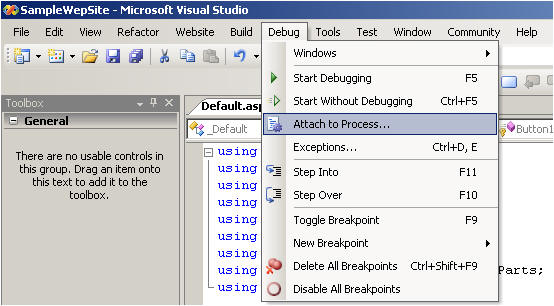
Now we are going to attach to the process. In Visual Studio, go to DebugAttach to Process

Fig. 11: Opening the Attach to Process window
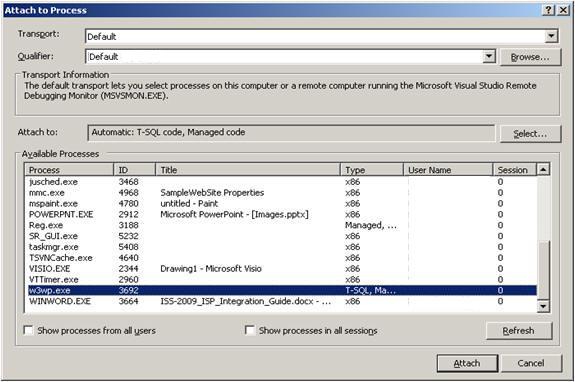
After clicking Attach to Process, the following screen will come up

Fig. 12: Attach to Process window, showing a single Worker Process running
Now we are able to see that the Worker Process is running, and we need to attach that process. Select the process and click on the Attach button. After that, look at the two images below:

Fig. 13-1: Process attached successfully

Fig. 13-2: Process not attached
Did you notice the breakpoint symbol? If the Worker Process attached successfully, within the code, the breakpoint symbol should be a solid circle. Otherwise it will have a warning icon as shown. For a single Worker Process, this scenario is not common. However, when we have multiple Worker Processes running on IIS, then we can have some confusion. I will discuss the same in a later section.
Now if we click the Debug button after successfully attaching to the process, execution will stop at the breakpoint.
Next, let's have a look at what to do if we have multiple Worker Processes running.

How to attach to one of many running Worker Processes

Now, when this scenario will come up? When we have multiple sites hosted on IIS, and those sites have their own Application Pool. Now, multiple Application Pools means multiple Worker Processes are running.
Here I have three Application Pools in my IIS. They are:
  1. Default Application Pool
  2. Generic Application Pool
  3. State Server Application Pool
Now, my SampleWebSite is associated with the DefaultAppPool. Now, I want to attach the process to debug my SampleWebSite. Follow the same steps as before. Open the Process Attach window:

Fig. 14: List of multiple Worker Process
Just have a look, there are three Worker Processes currently running, and you have to attach one of them. But, you do not know which Worker Process is the default Application Pool's. What you do is, you select any one of them at random, let's say the one with process ID = 4308, and suppose it is not the Worker Process for the default Application Pool. So what will happen if you attach to a wrong process? Check the image below:

Fig. 15: Breakpoint when the process is not attached correctly

Getting a list of running Worker Processes

Now what is the solution for the previous case? Here is a quick tip:
  • Start → Run command → cmd
  • Change directory to \Windows\System32
  • Run the command: cscript iisapp.vbs
and wait for the output. Wow! You get a list of running Worker Process, Process ID and Application Pool Name!

Fig. 16: List of running Worker Processes with PID and Application Pool name

Attaching to the correct process

From here you can easily identify the correct Application Pool name and its process ID. Now, return to Visual Studio → Attach Process. Now you know that the process ID for Default Application Pool is 1772, so Attach to that process.

Fig. 17: Attach the correct process for debugging
Now, enjoy debugging!

Fig. 18: Breakpoint is ready

Summary

Sometimes we need to debug our application which is hosted on IIS. For that, we need to attach the running Worker Process to the Visual Studio. If we have multiple Worker Processes running on the IIS server, we can identify the appropriate Worker Process by using the command cscript iisapp.vbs.
I hope this article will help beginners who are still struggling with debugging applications that are hosted on IIS. Please give your feedback and suggestions to improve the article.
Thank you.

Source: http://www.codeproject.com/Articles/37182/Debug-your-ASP-NET-Application-while-Hosted-on-IIS

Thursday, February 27, 2014

404.3 Error for ASMX page in IIS 8.5


When try to add a web service project to a fresh installed iis, this problem occurs.

I tried several options and finally after adding asp.net option in iis, this becomes solved.

In windows 8, Goto Control Panel -> programs -> programs and features

Click Turn windows features on or off.

Check whether you installed asp.net as shown in the below screen.